A 3D textbook is a creative school-themed craft project that transforms ordinary paper and cardboard into a three-dimensional model of a book. Unlike a flat drawing of a textbook, a 3D textbook has visible pages, a cover, a spine, and other details that make it look like a real book. This simple project can be used for classroom decoration, school exhibitions, educational displays, miniature classrooms, and creative activities for children.
Making a 3D textbook is also an excellent way to combine art with learning. Children can practice measuring, cutting, folding, gluing, drawing, and decorating while thinking about the importance of books in education. The project can be made with inexpensive materials, and recycled cardboard can be used to make the structure stronger. With imagination, children can create a mathematics textbook, science book, language book, history book, or even an imaginary book filled with their own ideas.
Understanding the 3D Textbook
A traditional textbook is a collection of printed pages used for studying a particular subject. A 3D textbook model represents that familiar object in a larger or smaller three-dimensional form.
The model can be designed to look closed, partially open, or completely open. A closed textbook is usually easier to make because it requires only a cover, spine, and pages. An open textbook can be more detailed because it needs two sections that look like pages lying flat.
For a school craft project, the most important goal is to make the model recognizable. Even simple shapes can communicate the idea of a textbook when they are combined correctly.
Materials Needed

The materials for a 3D textbook are simple and affordable. Cardboard is useful for creating the front and back covers. White paper can represent the pages, while colored paper can be used for the cover.
Other supplies include scissors, glue, tape, a ruler, a pencil, markers, crayons, and colored pencils. Recycled cereal boxes or packaging cardboard can provide an excellent base.
Small pieces of paper can be used to create page lines, illustrations, labels, and diagrams. Stickers and decorative materials can also be added.
Using recycled materials makes the activity inexpensive and environmentally friendly.
Planning the Model
Before construction begins, children should decide how large their 3D textbook will be. A simple drawing can show the front cover, back cover, spine, and pages.
The measurements should be planned before cutting the cardboard. The front and back covers should normally be the same size.
If the book is designed to look open, the two sides should be balanced so that the model can stand properly.
Planning helps prevent wasted materials and makes construction easier. It also teaches children that successful craft projects often begin with an idea and a clear plan.
Creating the Covers
The covers are the strongest parts of the model. Two equal pieces of cardboard can be cut to represent the front and back covers.
The cardboard can then be covered with colored paper. Blue, green, red, yellow, or any other color can be used.
The front cover should contain a title. For example, children can create a model called “Science Textbook,” “My Math Book,” “English Grammar,” or “World History.”
A name, grade level, or imaginary school logo can also be added.
Making the Pages
The pages give the 3D textbook its realistic appearance. Several sheets of white paper can be stacked together and attached between the covers.
The pages do not need to be full-sized sheets. They should be cut to match the dimensions of the cardboard covers.
For a thicker book, more layers of paper can be added. However, the model should not become unnecessarily heavy.
Lines can be drawn along the visible edge of the pages. These lines create the appearance of individual sheets.
Another simple technique is to use a thick piece of white cardboard between the covers and draw many thin horizontal lines along its edges.
Creating the Spine
The spine connects the front and back covers. It is also one of the most recognizable parts of a textbook.
A strip of colored paper or cardboard can be attached along the side of the book. The title can be written vertically on the spine.
For example, a science textbook might have the words “SCIENCE” written along its spine.
Adding a spine makes the model look more realistic and helps children understand how the different parts of a book are connected.
Designing the Front Cover
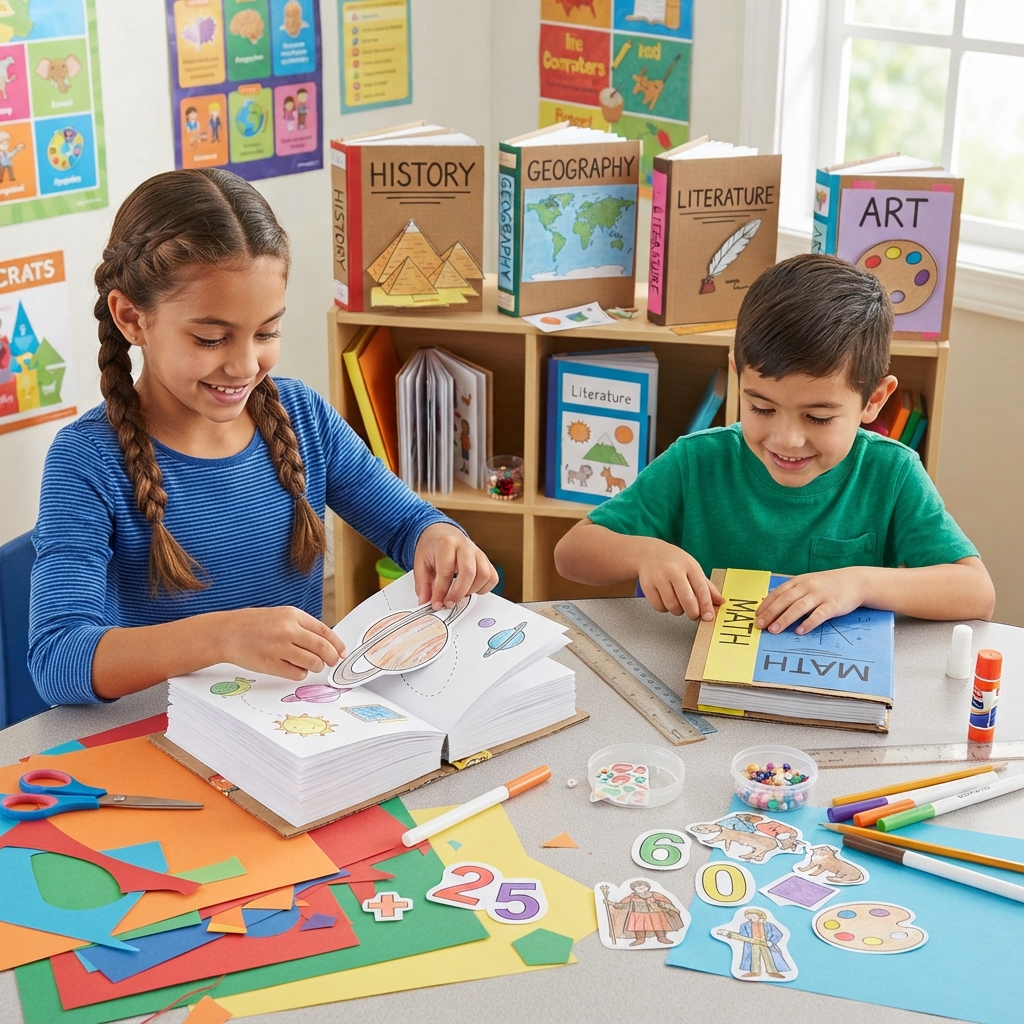
The front cover is an opportunity for artistic expression. A science textbook might show a planet, microscope, plant, or animal. A mathematics book might feature numbers, shapes, and equations. A geography book might have a small map.
Children can draw these images themselves or create them using cut paper.
The title should be large and easy to read. Different lettering styles can make the cover more attractive.
A simple border around the cover can also give the model a finished appearance.
Making a 3D Open Textbook
An open textbook can be more visually interesting than a closed one. The model can be constructed so that the two covers are spread apart like a real book lying open.
Each side can contain several layers representing pages.
A small strip of cardboard can connect the two sides in the center. This represents the book’s binding.
The open pages can contain drawings, diagrams, words, or miniature lessons.
This version is especially useful for classroom displays because viewers can see the educational content inside the model.
Adding Educational Content
A 3D textbook does not have to be empty. Adding educational content makes it more meaningful.
For a science book, children can add pictures of planets, animals, plants, or the human body. For mathematics, they can add numbers, shapes, multiplication tables, and simple problems.
A language textbook could contain vocabulary words and short sentences. A history textbook could show famous historical objects, timelines, or important places.
This allows the craft to become part of an actual lesson.
Creating Miniature Illustrations
Small paper illustrations can make the pages more attractive. Children can cut tiny shapes from colored paper and glue them onto the pages.
For example, a science textbook might have a paper butterfly, a leaf, and a small diagram of the solar system.
These illustrations can be flat or slightly raised to create a stronger three-dimensional effect.
Small folded paper pieces can also be used to make pop-up elements inside the textbook.
Adding Pop-Up Elements
One exciting version of the project is a pop-up 3D textbook. When the book is opened, certain pictures or objects can rise from the pages.
A simple pop-up can be made by folding a small strip of paper into a support and attaching a picture to it. When the book opens, the picture stands upright.
Children can create pop-up trees, animals, buildings, planets, numbers, or letters.
This technique makes the textbook interactive and visually exciting.
Educational Benefits
Making a 3D textbook provides many educational benefits. Children develop fine motor skills through cutting, folding, gluing, and drawing.
The activity also encourages creativity because there is no single correct design. Students can choose the subject, colors, illustrations, and layout.
The project develops spatial awareness as children think about how flat materials can become three-dimensional objects.
It also improves planning and problem-solving. If a page is too large or a cover does not fit, students must find a solution.
Learning About Books
The project can also teach children about the structure of real books. While making the model, they can learn the names of different parts, including the cover, spine, pages, title, and back cover.
Teachers can use the craft to explain how textbooks are organized. Students may discover that books contain chapters, headings, pictures, diagrams, glossaries, indexes, and other features.
This makes the activity useful for language lessons as well as art classes.
Using Recycled Materials
A 3D textbook can easily be made from recycled materials. An old cereal box can become the front and back covers. Used paper can become pages, while packaging scraps can be used for decorations.
This approach teaches children about reuse and environmental responsibility.
Instead of throwing away cardboard, students can turn it into a useful educational object.
The project demonstrates that creativity does not always require expensive materials.
Creating a Miniature School Library
Several 3D textbooks can be combined to create a miniature school library. Students can make books on different subjects and place them on tiny cardboard shelves.
A miniature library could include mathematics books, science books, storybooks, history books, and art books.
Children can also make tiny tables, chairs, lamps, and library signs.
This larger project can become an impressive classroom display.
Working as a Team
The project can be completed individually or as a group. In a classroom, each student can create a textbook based on a different subject.
One student might make a science book, another a mathematics book, and another a language book.
The finished models can be arranged together to create a miniature bookshelf or classroom library.
Teamwork helps children practice communication and cooperation. They can share materials, exchange ideas, and help one another solve construction problems.
Common Challenges
One common challenge is making the book strong enough to stand. Thin paper alone may bend, so cardboard is useful for the main structure.
Another problem is attaching the pages evenly. Measuring carefully before gluing can help.
If the book becomes too thick, fewer pages can be used. If it looks too flat, additional layers can be added.
Children may also find that pop-up elements do not fold correctly. Testing each fold before adding glue can prevent mistakes.
These challenges encourage patience and problem-solving.
Safety Tips
Children should use scissors carefully and follow age-appropriate instructions. Adult supervision may be necessary for younger children.
Glue should be used carefully, and the work area should be kept clean.
If a hot glue gun is used for stronger construction, it should only be operated by an adult or under close adult supervision.
All materials should be appropriate for the child’s age.
Presenting the Finished Textbook
When the model is complete, it can be presented to classmates, teachers, or family members.
The student can explain the subject of the textbook, describe how it was made, and point out its special features.
If the book contains educational information, the student can also explain one or two facts shown on its pages.
This presentation helps develop communication and public-speaking skills.
Conclusion
A 3D textbook is a simple but highly creative school craft project that turns ordinary paper and cardboard into a three-dimensional educational model. It can be designed as a closed book, an open book, or even an interactive pop-up textbook.
The project encourages children to practice cutting, measuring, folding, gluing, drawing, and decorating. At the same time, it introduces them to the structure of books and the importance of textbooks in learning.
One of the best features of the project is its flexibility. A child can create a science book filled with planets and animals, a mathematics book decorated with numbers and shapes, or a language book filled with words and pictures. Older students can make more advanced versions with realistic pages, detailed covers, and pop-up illustrations.
The project can also support environmental education because recycled cardboard and paper can be used. Children learn that materials that might otherwise become waste can be transformed into something useful and beautiful.
A collection of 3D textbooks can even become a miniature classroom library. When combined with handmade tables, chairs, shelves, and other school crafts, the books can form part of a complete educational scene.
Ultimately, the 3D textbook is more than a decorative paper model. It is a hands-on learning activity that combines art, education, creativity, measurement, and problem-solving. By making their own miniature textbooks, children can discover that learning can be both informative and enjoyable. A simple piece of cardboard and a few sheets of paper can become a small three-dimensional book that represents the wonderful world of knowledge.