Creating a model of a department inside a shoebox is a creative and educational craft project that combines imagination, design, organization, and learning. A simple shoebox can be transformed into a miniature department, showing different rooms, objects, workers, and activities. This type of project is especially useful for students because it allows them to turn an ordinary box into a three-dimensional learning display. Instead of only reading about how a department works, students can create a small model that shows its different sections in a clear and interesting way.
A department can mean many different things depending on the project. It could represent a department in a school, hospital, company, store, government building, police station, fire station, or another organization. The basic idea remains the same: the shoebox becomes a small building, while cardboard, paper, colored pencils, glue, recycled materials, and small objects are used to create the different areas inside it. The finished model can be displayed on a classroom table or presented during a school project.
Understanding the Idea of a Shoebox Department
The first step in making this project is understanding what a department is. A department is usually a section of a larger organization that has a particular purpose. For example, a hospital may have emergency, surgery, laboratory, and reception departments. A school may have different departments for subjects such as science, mathematics, languages, and art. A company may have sales, accounting, human resources, and marketing departments.
A miniature department should therefore show the purpose and organization of the chosen place. Before beginning the craft, the student should decide what type of department will be represented. This decision will influence the colors, furniture, signs, people, and other details added to the shoebox.
The project does not have to be complicated. Even a small box can contain several important details. The goal is not to create a perfect architectural model but to communicate an idea clearly. A carefully planned simple model can be more effective than a complicated model that is difficult to understand.
Materials Needed

One of the best features of a shoebox department model is that it can be made with inexpensive and recycled materials. The main material is an empty shoebox. The lid can be used as a base, a roof, or a separate part of the display.
Other useful materials include colored paper, white paper, cardboard, scissors, glue, tape, pencils, markers, crayons, rulers, and paint. Small pieces of cardboard can become tables, desks, shelves, doors, and walls. Bottle caps can be transformed into chairs, containers, or decorative objects. Ice-cream sticks can be used to make furniture or frames.
Students can also use recycled materials such as cereal boxes, tissue rolls, paper scraps, buttons, yarn, and plastic containers. These materials encourage creativity while teaching children that everyday objects can be reused instead of thrown away.
Planning the Model
Good planning is one of the most important parts of the project. Before cutting or gluing anything, the student should make a simple drawing of the shoebox interior. The drawing does not need to be artistic. It only needs to show where the different areas will be placed.
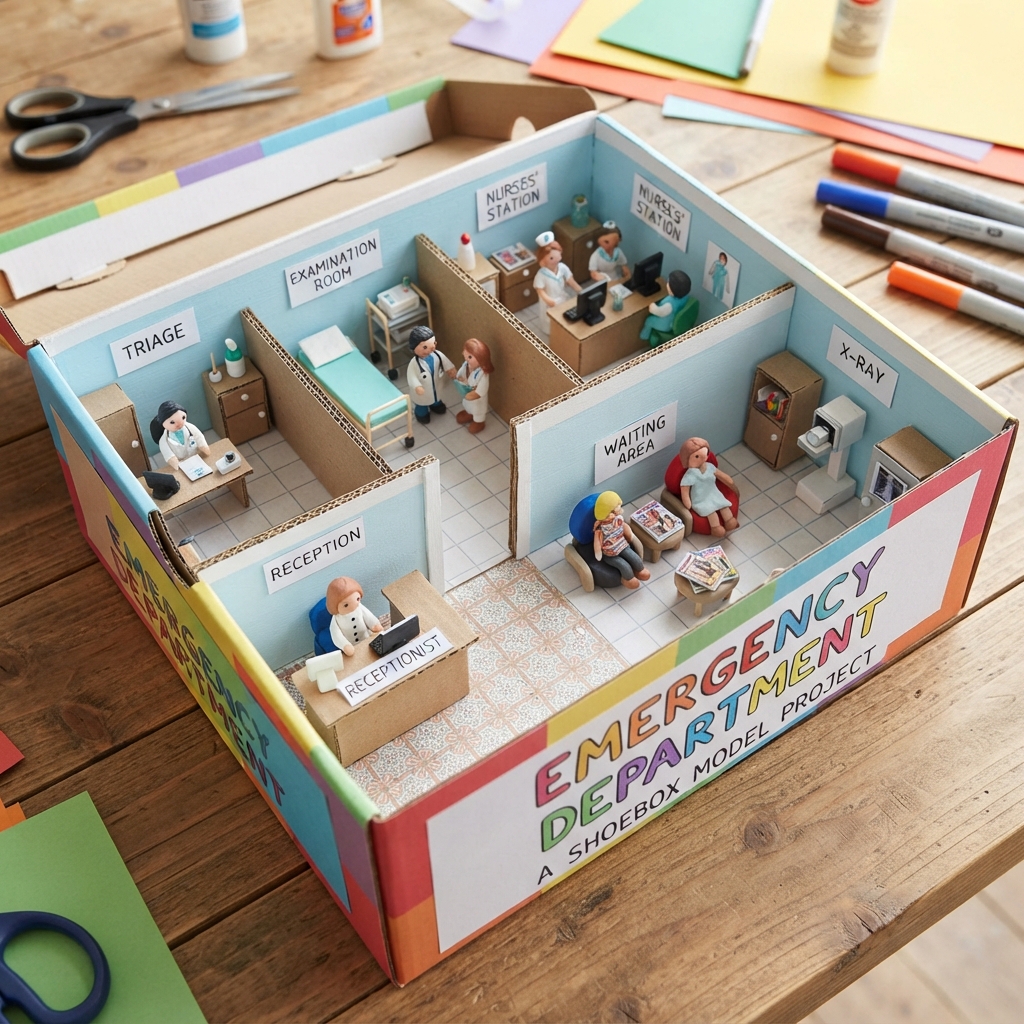
For example, a department model might have a reception desk near the entrance, several workstations along one side, a meeting area in the back, and storage shelves against another wall. If the model represents a hospital department, the student might include a reception area, examination room, waiting room, and medical storage area.
Planning prevents the shoebox from becoming crowded. It also makes the construction process easier because the student knows where each object should go.
Preparing the Shoebox
The shoebox should be clean and dry before construction begins. If necessary, the student can remove loose pieces of paper or labels from the box. The inside walls can then be covered with colored paper or painted.
Choosing appropriate colors can make the model more attractive. Light colors often make the interior look larger and cleaner. Different colors can also be used to identify different sections. For example, a science department might use blue and green decorations, while an art department could have many bright colors.
The bottom of the shoebox can represent the floor. Colored paper, cardboard, or patterned craft paper can be attached to create a realistic floor. Small lines can be drawn to represent tiles or wooden boards.
Creating Walls and Sections
A department often contains several rooms or working areas. These can be created inside the shoebox using pieces of cardboard. Cardboard dividers can be cut to the correct size and attached vertically to the floor.
It is important not to create too many walls because they can hide the interior. Short dividers are often useful because they separate areas while allowing viewers to see the entire model.
Doors and windows can be drawn or cut from paper. Small signs can be placed above each room. Labels such as “Reception,” “Office,” “Meeting Room,” “Storage,” or “Laboratory” help viewers understand the purpose of each area.
Making Miniature Furniture
Furniture is one of the most enjoyable parts of building a department model. Small pieces of cardboard can be turned into desks and tables. Tiny rectangles of paper can become computers, books, files, or documents.
Chairs can be made from cardboard, folded paper, bottle caps, or small pieces of craft foam. Shelves can be created from narrow strips of cardboard. A miniature cupboard can be made by folding a small cardboard box.
Although the furniture is tiny, adding a few recognizable objects makes a major difference. A desk with a small computer, a chair, a notebook, and a pencil immediately looks like a workplace.
Students should avoid adding too many objects. A neat arrangement makes the model easier to understand and gives it a professional appearance.
Adding People to the Model
Miniature people can make the department feel active. They can be drawn on paper, cut out, and attached to the floor using folded paper supports. Alternatively, students can make small figures from cardboard or modeling clay.
The people should represent workers, visitors, students, customers, patients, or other individuals appropriate to the selected department. Their positions can also show different activities. For example, one person might be sitting at a reception desk while another is working at a computer.
These small figures help tell a story. Instead of simply looking like an empty room, the department becomes a place where people perform different responsibilities.
Adding Signs and Labels
Labels are particularly important in an educational model. A department may contain many small objects, and viewers may not immediately understand what each object represents.
A clear title can be placed at the top of the shoebox. Individual areas can then be labeled with small signs. Students can also add arrows showing how people move through the department.
A small information card placed beside the model can explain its purpose. It might include the department’s name, its main responsibilities, and the jobs performed there.
Labels also improve students’ communication skills because they must decide which information is most important.
Making the Model More Realistic
Small details can make a simple shoebox model look surprisingly realistic. For example, a school department could include a notice board, books, pencils, a teacher’s desk, and student chairs. A hospital department could include beds, medical equipment, signs, and a reception counter. A company department could include computers, office desks, files, and meeting tables.
Textures can also add visual interest. Paper can represent wood, tiles, glass, or metal. Aluminum foil may be used for shiny surfaces, while fabric scraps can become curtains or carpets.
However, realism should not become more important than clarity. The model should remain easy to understand and strong enough to survive handling.
The Educational Value of the Project
A shoebox department model offers many educational benefits. First, it develops creativity. Students must imagine how a real place can be represented using small and simple materials.
Second, the activity improves planning and problem-solving. Students may discover that a piece of furniture is too large or that two sections do not fit properly. They must think of practical solutions.
Third, the project develops fine motor skills. Cutting cardboard, folding paper, drawing small objects, and gluing pieces together require careful hand movements.
The activity can also teach organizational skills. A department is usually organized according to different responsibilities, and the model helps students understand how spaces and jobs are connected.
Working on the Project as a Team
A shoebox department can also be completed as a group project. Each student can receive a different responsibility. One student might design the interior, another might make furniture, another might create people, and another might prepare labels.
Teamwork teaches students how to communicate and share responsibilities. It also shows that a large project can become easier when different people contribute their skills.
Students should discuss their ideas before beginning. This prevents two people from creating the same part while another important section is forgotten.
Presentation of the Finished Model
Once the model is complete, presentation becomes an important final step. The student should be able to explain what department has been created and why each area is included.
During a classroom presentation, the student can point to each section and describe its purpose. They can explain who works there, what activities happen there, and how the different areas are connected.
A good presentation does not require memorizing a long speech. A few clear sentences about the design and its purpose are usually enough.
Environmental Benefits
Using a shoebox for this project also teaches students about recycling. Instead of throwing away an old box, they can give it a new purpose.
Many parts of the model can come from household waste. Cardboard packaging, paper scraps, bottle caps, and other clean materials can become useful craft supplies. This encourages students to think creatively about waste and reuse.
The project therefore combines art with environmental awareness. It demonstrates that creativity does not always require expensive materials.
Challenges and Solutions
Students may face several challenges while building the model. One common problem is making furniture that is too large. The solution is to measure the available space before cutting the material.
Another problem is weak construction. If cardboard walls fall over, additional tape or folded supports can be added. If glue does not hold, small pieces of tape can temporarily support the structure while the glue dries.
A crowded interior can also be difficult to see. In this situation, some furniture should be removed or made smaller. The best model is not necessarily the one with the greatest number of objects. It is the one that communicates its idea clearly.
Conclusion
The model of a department inside a shoebox is a simple but meaningful educational craft project. It transforms an ordinary box into a miniature working environment where students can explore organization, creativity, design, and communication. By using cardboard, paper, recycled materials, and imagination, students can create offices, classrooms, hospitals, stores, laboratories, or many other types of departments.
The project begins with an idea and a plan, then develops through cutting, drawing, building, decorating, and labeling. Every small detail has a purpose, from the floor and walls to the furniture, people, signs, and information cards. More importantly, the activity teaches students that learning can happen through making and experimenting.
A shoebox department model is also a reminder that impressive projects do not need expensive materials. With an old shoebox and a few simple craft supplies, a student can create an attractive three-dimensional display. The finished model can become a classroom decoration, a science or social studies project, an art assignment, or a presentation tool.
Ultimately, the greatest value of the shoebox department model is the combination of imagination and knowledge. Students do not simply build a miniature room; they create a visual representation of how a real department works. Through this hands-on experience, they learn to plan, organize, solve problems, work with others, and explain their ideas. What begins as an empty shoebox can therefore become a small but powerful model of the real world.