A Small School Table and Chair Made of Wooden Sticks

by August 24, 2026
11 minutes read
# A Small School Table and Chair Made of Wooden Sticks Making a small school table and chair from wooden sticks is a simple, creative, and educational craft project for children. With a few wooden craft sticks, glue, cardboard, paper, and some imagination, it is possible to create a miniature classroom scene. This project is especially interesting because it transforms simple materials into familiar objects that children see every day at school. The finished table and chair can be used as part of a miniature classroom, dollhouse, school project, or creative display. A miniature school table and chair made from wooden sticks can also introduce children to basic ideas about construction, measurement, balance, design, and organization. While the project looks like a small craft, it requires planning and careful assembly. Children learn that even a simple piece of furniture needs a strong structure to remain stable. ## Understanding the Project A school table and chair are important pieces of classroom furniture. Students use tables for writing, reading, drawing, and completing school activities. Chairs allow them to sit comfortably while learning. Creating miniature versions of these objects gives children an opportunity to understand how furniture is constructed. Wooden craft sticks are especially useful because they are lightweight, easy to arrange, and strong enough for small models. The project can be adapted to different ages. Younger children can make a basic table and chair with adult assistance, while older children can create more detailed models with tabletops, legs, backrests, shelves, and decorations. The finished furniture does not need to be perfectly realistic. The main purpose is to encourage creativity and teach children how different pieces can be joined together to create a stable structure. ## Materials Needed The main material for the project is wooden craft sticks. These can be ordinary flat wooden sticks or slightly thicker craft sticks. The number needed depends on the size and design of the model. Other materials include strong craft glue, cardboard, a ruler, a pencil, scissors, paper, markers, and paint. Cardboard can be used as a base to make the furniture more stable. Small pieces of ribbon, colored paper, stickers, or foam can be used for decoration. If children want to create a complete miniature classroom, additional materials can include bottle caps, cardboard boxes, paper, and recycled packaging. It is useful to prepare all materials before construction begins. Keeping everything nearby makes the activity easier and more organized. ## Planning the Design Planning is an important part of building miniature furniture. Before gluing the wooden sticks together, children should decide how the table and chair will look. A simple drawing can show the tabletop, legs, and supports. Another drawing can show the chair seat, legs, and backrest. The proportions should be considered carefully. The chair should be smaller than the table, and the table should be wide enough to look comfortable for a miniature student. Using a ruler helps children create pieces that are similar in length. Accurate measurements can make the final model more balanced. ## Making the Tabletop The tabletop is usually the first part of the miniature table to build. Several wooden sticks can be placed next to each other horizontally to form a flat surface. Small wooden sticks can be glued across the underside as supports. These supports hold the main sticks together and prevent them from moving apart. The tabletop should be allowed to dry before the legs are attached. If the glue is still wet, the sticks may move out of position. For a different design, cardboard can be used as the tabletop and covered with wooden sticks. This can provide additional strength and make construction easier. ## Building the Table Legs The legs are responsible for supporting the tabletop. Four wooden sticks can be used as legs, one near each corner. The sticks should be attached vertically or at a slight angle, depending on the desired design. It is important to make sure that the legs are approximately the same length. Unequal legs can cause the table to wobble. Small horizontal supports can be added between the legs. These supports strengthen the structure and make the miniature table more realistic. The table should be placed on a flat surface during construction so that the legs can be adjusted before the glue dries. ## Adding Table Supports Real tables often contain supporting structures beneath the tabletop. A miniature table can include small wooden sticks connecting the legs. These supports can form a rectangle underneath the tabletop. They make the model stronger and demonstrate how structural support works. Children can observe that a table is not simply a flat surface with legs. Different parts work together to distribute weight and keep the furniture stable. This is a simple introduction to engineering concepts. ## Making the Chair Seat The chair can be made in a similar way. Several wooden sticks can be arranged side by side to create the seat. Two or more sticks can be placed underneath as supports. The seat should be smaller than the tabletop. Its size should also match the height of the miniature table. A cardboard seat can be used if children find it difficult to connect many wooden sticks. Wooden sticks can then be placed over the cardboard to create a natural wooden appearance. ## Building the Chair Legs Four wooden sticks can form the chair legs. They should be attached underneath the seat. The legs must be positioned carefully so that the chair can stand without falling. Additional horizontal supports can be placed between the legs. These supports make the chair stronger and can also give it a more realistic appearance. Children should test the chair on a flat surface before continuing. If it leans to one side, one of the legs may need to be repositioned. ## Creating the Chair Backrest A school chair usually has a backrest, and adding one makes the miniature model look more complete. Several wooden sticks can be placed vertically or horizontally to create the backrest. Two longer sticks can serve as side supports. The backrest should be attached securely to the back of the seat. Children can experiment with different patterns. For example, they can create a simple solid backrest or arrange the sticks in a decorative pattern. ## Decorating the Furniture Once the table and chair are structurally complete, children can decorate them. The wooden sticks can be left natural for a simple wooden appearance. They can also be painted in bright colors. A school table might be painted blue, green, yellow, or another favorite color. The chair can match the table or have a contrasting color. Small drawings or patterns can be added using markers. Children can also place a tiny paper book, pencil, or notebook on the table. Decorations should be added after the glue has completely dried. ## Creating a Miniature Classroom The small table and chair can become part of a larger classroom model. A cardboard box can serve as the classroom walls. Children can create several tables and chairs for miniature students. A teacher's desk, blackboard, bookshelf, classroom door, and windows can also be added. A small piece of black or dark-colored cardboard can become a chalkboard. Tiny pieces of paper can represent books and classroom posters. This larger project allows children to imagine what happens inside a classroom and how different objects are organized. ## Adding Miniature Students Tiny students can be made from paper, cardboard, modeling clay, or other craft materials. They can be placed on the chairs around the tables. Some can appear to be writing, while others can be reading or raising their hands. Adding students makes the classroom scene more lively. Children can also create a miniature teacher and place the figure near the teacher's desk. This can lead to storytelling activities in which children imagine a lesson taking place inside their handmade classroom. ## Educational Benefits The wooden-stick school furniture project provides many educational benefits. It develops creativity because children must imagine how simple sticks can become recognizable objects. It also improves fine motor skills. Picking up small sticks, applying glue, positioning pieces, and decorating the furniture require careful hand movements. The activity develops patience as well. Glue needs time to dry, and some parts may need to be adjusted before the model is finished. Children also practice problem-solving. If the table is unstable, they need to determine why and find a solution. ## Learning About Measurement The project provides a natural way to practice measurement. Children can measure the lengths of wooden sticks and compare the sizes of the table and chair. They can learn about concepts such as height, width, length, symmetry, and proportion. For older students, the project can become a simple mathematics activity. They might calculate how many sticks are needed or determine the difference between the height of the table and chair. This demonstrates how mathematics can be used in practical situations. ## Learning About Balance and Structure The project also introduces basic engineering concepts. A table must have a stable base, and its legs need to be positioned correctly. The same principle applies to the chair. If one leg is too short or poorly positioned, the chair may wobble. Children can experiment with different structures and observe which designs are stronger. This type of hands-on learning helps children understand that objects are designed according to practical principles. ## Using Recycled Materials Although wooden craft sticks are the main material, many other parts of the project can be made from recycled items. Old cardboard can become a classroom floor. Packaging can become walls, shelves, or books. Paper scraps can become posters and notebooks. Using recycled materials teaches children that useful craft supplies can often be found around the home. It also encourages environmental responsibility by showing that materials can be reused creatively. ## Working as a Group The project can be completed individually or as a group activity. In a classroom, students can work together to create a complete miniature school. One group can build tables and chairs, another can create the classroom walls, and another can make books, students, and decorations. Working together encourages communication and cooperation. Each student can contribute a different skill, making the final project a shared achievement. ## Common Challenges One common challenge is keeping the wooden sticks in place while the glue dries. Children can use small pieces of tape to temporarily hold them together. Another challenge is creating equal-length legs. Measuring the sticks before construction helps solve this problem. The table or chair may also become too heavy if too much glue or too many materials are used. Using only the necessary amount of material keeps the model light. If the furniture becomes unstable, extra supports can be added underneath. These challenges are valuable because they encourage children to experiment and improve their designs. ## Safety Tips Children should use scissors and craft materials carefully. Young children may need adult assistance when cutting cardboard or using certain types of glue. Glue should be used in a well-ventilated area and according to its instructions. Hot glue guns should only be handled by adults or used under close adult supervision. Wooden sticks should be checked to ensure that they are smooth and free from sharp splinters. A clean work surface makes the project safer and easier to manage. ## Conclusion A small school table and chair made from wooden sticks is a wonderful craft project that combines creativity, education, and simple construction. With a few wooden sticks, glue, cardboard, and decorative materials, children can create miniature furniture that resembles the tables and chairs found in a real classroom. The activity teaches much more than crafting. Children learn about measurement, balance, structure, proportion, organization, and problem-solving. They also develop fine motor skills and patience as they carefully position and glue each piece. The finished table and chair can stand alone as a miniature display or become part of a larger school model. Children can add a blackboard, teacher's desk, books, students, shelves, and other classroom objects to create a complete miniature learning environment. Perhaps the most valuable lesson is that simple materials can be transformed through creativity. A collection of ordinary wooden sticks can become useful-looking furniture when the pieces are carefully planned and assembled. This encourages children to look at everyday materials in new ways. Whether made at home, in a classroom, or as part of a school exhibition, a wooden-stick school table and chair provide an enjoyable hands-on experience. The project combines art with practical learning and gives children the satisfaction of creating something with their own hands. In the end, the tiny table and chair are not only attractive handmade objects but also examples of creativity, patience, teamwork, and simple engineering.

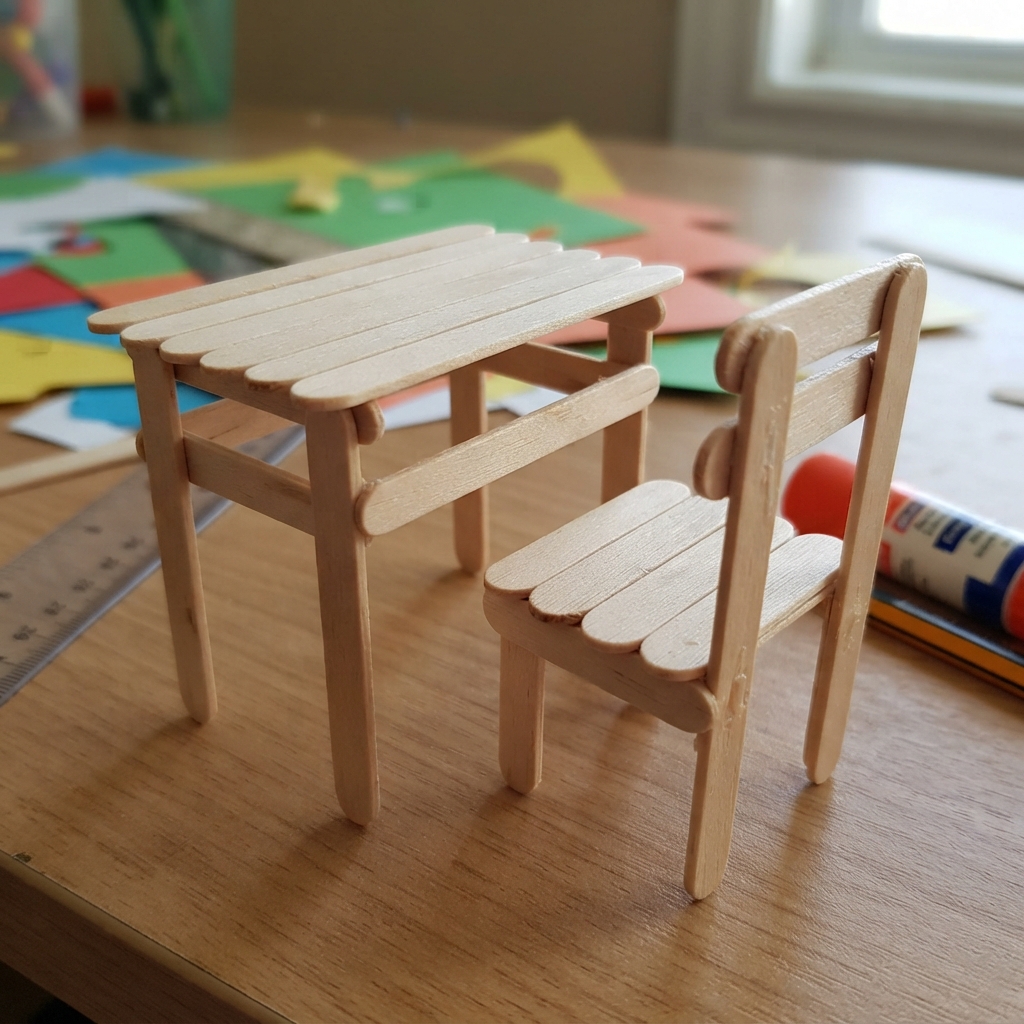
Making a small school table and chair from wooden sticks is a simple, creative, and educational craft project for children. With a few wooden craft sticks, glue, cardboard, paper, and some imagination, it is possible to create a miniature classroom scene. This project is especially interesting because it transforms simple materials into familiar objects that children see every day at school. The finished table and chair can be used as part of a miniature classroom, dollhouse, school project, or creative display.

A miniature school table and chair made from wooden sticks can also introduce children to basic ideas about construction, measurement, balance, design, and organization. While the project looks like a small craft, it requires planning and careful assembly. Children learn that even a simple piece of furniture needs a strong structure to remain stable.

Understanding the Project

A school table and chair are important pieces of classroom furniture. Students use tables for writing, reading, drawing, and completing school activities. Chairs allow them to sit comfortably while learning.

Creating miniature versions of these objects gives children an opportunity to understand how furniture is constructed. Wooden craft sticks are especially useful because they are lightweight, easy to arrange, and strong enough for small models.

The project can be adapted to different ages. Younger children can make a basic table and chair with adult assistance, while older children can create more detailed models with tabletops, legs, backrests, shelves, and decorations.

The finished furniture does not need to be perfectly realistic. The main purpose is to encourage creativity and teach children how different pieces can be joined together to create a stable structure.

Materials Needed
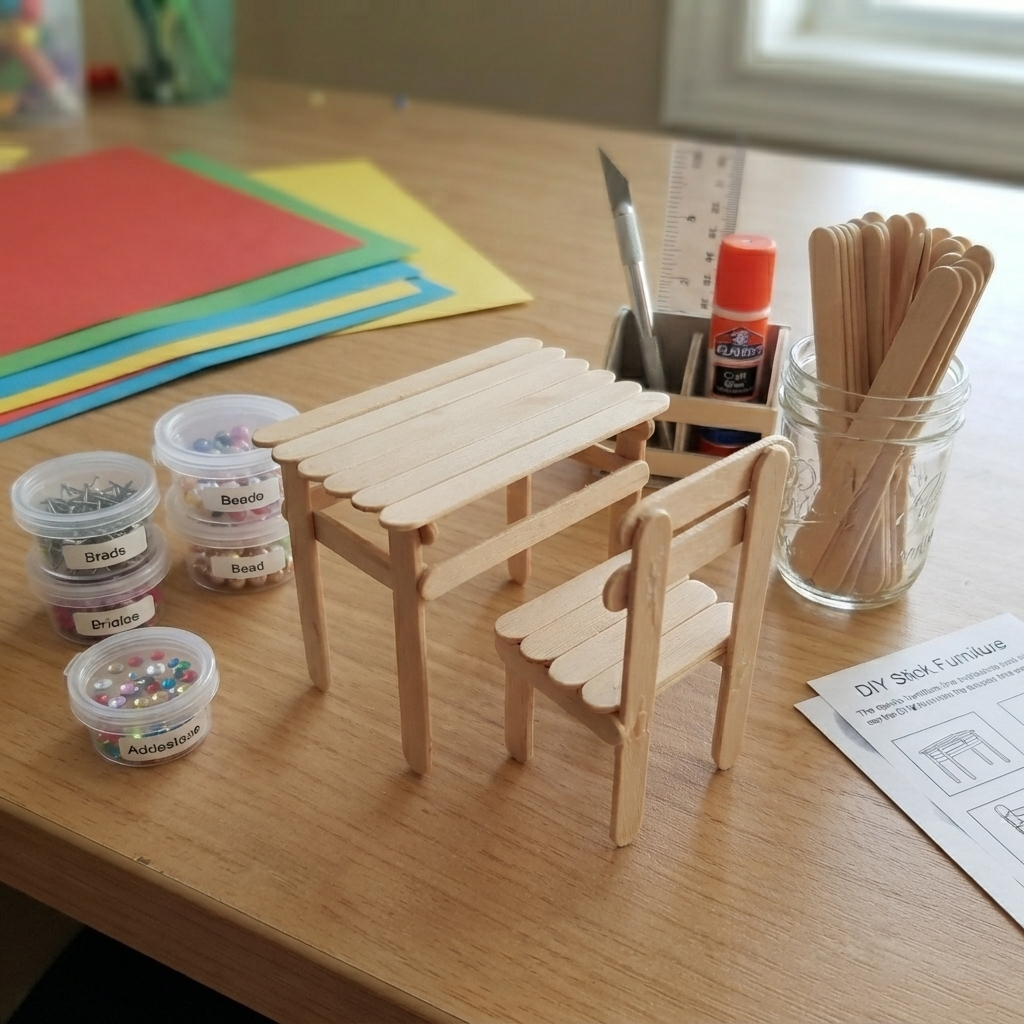
The main material for the project is wooden craft sticks. These can be ordinary flat wooden sticks or slightly thicker craft sticks. The number needed depends on the size and design of the model.

Other materials include strong craft glue, cardboard, a ruler, a pencil, scissors, paper, markers, and paint. Cardboard can be used as a base to make the furniture more stable.

Small pieces of ribbon, colored paper, stickers, or foam can be used for decoration. If children want to create a complete miniature classroom, additional materials can include bottle caps, cardboard boxes, paper, and recycled packaging.

It is useful to prepare all materials before construction begins. Keeping everything nearby makes the activity easier and more organized.

Planning the Design

Planning is an important part of building miniature furniture. Before gluing the wooden sticks together, children should decide how the table and chair will look.

A simple drawing can show the tabletop, legs, and supports. Another drawing can show the chair seat, legs, and backrest.

The proportions should be considered carefully. The chair should be smaller than the table, and the table should be wide enough to look comfortable for a miniature student.

Using a ruler helps children create pieces that are similar in length. Accurate measurements can make the final model more balanced.

Making the Tabletop

The tabletop is usually the first part of the miniature table to build. Several wooden sticks can be placed next to each other horizontally to form a flat surface.

Small wooden sticks can be glued across the underside as supports. These supports hold the main sticks together and prevent them from moving apart.

The tabletop should be allowed to dry before the legs are attached. If the glue is still wet, the sticks may move out of position.

For a different design, cardboard can be used as the tabletop and covered with wooden sticks. This can provide additional strength and make construction easier.

Building the Table Legs

The legs are responsible for supporting the tabletop. Four wooden sticks can be used as legs, one near each corner.

The sticks should be attached vertically or at a slight angle, depending on the desired design.

It is important to make sure that the legs are approximately the same length. Unequal legs can cause the table to wobble.

Small horizontal supports can be added between the legs. These supports strengthen the structure and make the miniature table more realistic.

The table should be placed on a flat surface during construction so that the legs can be adjusted before the glue dries.

Adding Table Supports

Real tables often contain supporting structures beneath the tabletop. A miniature table can include small wooden sticks connecting the legs.

These supports can form a rectangle underneath the tabletop. They make the model stronger and demonstrate how structural support works.

Children can observe that a table is not simply a flat surface with legs. Different parts work together to distribute weight and keep the furniture stable.

This is a simple introduction to engineering concepts.

Making the Chair Seat

The chair can be made in a similar way. Several wooden sticks can be arranged side by side to create the seat.

Two or more sticks can be placed underneath as supports.

The seat should be smaller than the tabletop. Its size should also match the height of the miniature table.

A cardboard seat can be used if children find it difficult to connect many wooden sticks. Wooden sticks can then be placed over the cardboard to create a natural wooden appearance.

Building the Chair Legs

Four wooden sticks can form the chair legs. They should be attached underneath the seat.

The legs must be positioned carefully so that the chair can stand without falling.

Additional horizontal supports can be placed between the legs. These supports make the chair stronger and can also give it a more realistic appearance.

Children should test the chair on a flat surface before continuing. If it leans to one side, one of the legs may need to be repositioned.

Creating the Chair Backrest

A school chair usually has a backrest, and adding one makes the miniature model look more complete.

Several wooden sticks can be placed vertically or horizontally to create the backrest. Two longer sticks can serve as side supports.

The backrest should be attached securely to the back of the seat.

Children can experiment with different patterns. For example, they can create a simple solid backrest or arrange the sticks in a decorative pattern.

Decorating the Furniture

Once the table and chair are structurally complete, children can decorate them.

The wooden sticks can be left natural for a simple wooden appearance. They can also be painted in bright colors.

A school table might be painted blue, green, yellow, or another favorite color. The chair can match the table or have a contrasting color.

Small drawings or patterns can be added using markers. Children can also place a tiny paper book, pencil, or notebook on the table.

Decorations should be added after the glue has completely dried.

Creating a Miniature Classroom

The small table and chair can become part of a larger classroom model. A cardboard box can serve as the classroom walls.

Children can create several tables and chairs for miniature students. A teacher’s desk, blackboard, bookshelf, classroom door, and windows can also be added.

A small piece of black or dark-colored cardboard can become a chalkboard. Tiny pieces of paper can represent books and classroom posters.

This larger project allows children to imagine what happens inside a classroom and how different objects are organized.

Adding Miniature Students

Tiny students can be made from paper, cardboard, modeling clay, or other craft materials.

They can be placed on the chairs around the tables. Some can appear to be writing, while others can be reading or raising their hands.

Adding students makes the classroom scene more lively.

Children can also create a miniature teacher and place the figure near the teacher’s desk.

This can lead to storytelling activities in which children imagine a lesson taking place inside their handmade classroom.

Educational Benefits

The wooden-stick school furniture project provides many educational benefits. It develops creativity because children must imagine how simple sticks can become recognizable objects.

It also improves fine motor skills. Picking up small sticks, applying glue, positioning pieces, and decorating the furniture require careful hand movements.

The activity develops patience as well. Glue needs time to dry, and some parts may need to be adjusted before the model is finished.

Children also practice problem-solving. If the table is unstable, they need to determine why and find a solution.

Learning About Measurement

The project provides a natural way to practice measurement. Children can measure the lengths of wooden sticks and compare the sizes of the table and chair.

They can learn about concepts such as height, width, length, symmetry, and proportion.

For older students, the project can become a simple mathematics activity. They might calculate how many sticks are needed or determine the difference between the height of the table and chair.

This demonstrates how mathematics can be used in practical situations.

Learning About Balance and Structure

The project also introduces basic engineering concepts. A table must have a stable base, and its legs need to be positioned correctly.

The same principle applies to the chair. If one leg is too short or poorly positioned, the chair may wobble.

Children can experiment with different structures and observe which designs are stronger.

This type of hands-on learning helps children understand that objects are designed according to practical principles.

Using Recycled Materials

Although wooden craft sticks are the main material, many other parts of the project can be made from recycled items.

Old cardboard can become a classroom floor. Packaging can become walls, shelves, or books. Paper scraps can become posters and notebooks.

Using recycled materials teaches children that useful craft supplies can often be found around the home.

It also encourages environmental responsibility by showing that materials can be reused creatively.

Working as a Group

The project can be completed individually or as a group activity. In a classroom, students can work together to create a complete miniature school.

One group can build tables and chairs, another can create the classroom walls, and another can make books, students, and decorations.

Working together encourages communication and cooperation.

Each student can contribute a different skill, making the final project a shared achievement.

Common Challenges

One common challenge is keeping the wooden sticks in place while the glue dries. Children can use small pieces of tape to temporarily hold them together.

Another challenge is creating equal-length legs. Measuring the sticks before construction helps solve this problem.

The table or chair may also become too heavy if too much glue or too many materials are used. Using only the necessary amount of material keeps the model light.

If the furniture becomes unstable, extra supports can be added underneath.

These challenges are valuable because they encourage children to experiment and improve their designs.

Safety Tips

Children should use scissors and craft materials carefully. Young children may need adult assistance when cutting cardboard or using certain types of glue.

Glue should be used in a well-ventilated area and according to its instructions. Hot glue guns should only be handled by adults or used under close adult supervision.

Wooden sticks should be checked to ensure that they are smooth and free from sharp splinters.

A clean work surface makes the project safer and easier to manage.

Conclusion

A small school table and chair made from wooden sticks is a wonderful craft project that combines creativity, education, and simple construction. With a few wooden sticks, glue, cardboard, and decorative materials, children can create miniature furniture that resembles the tables and chairs found in a real classroom.

The activity teaches much more than crafting. Children learn about measurement, balance, structure, proportion, organization, and problem-solving. They also develop fine motor skills and patience as they carefully position and glue each piece.

The finished table and chair can stand alone as a miniature display or become part of a larger school model. Children can add a blackboard, teacher’s desk, books, students, shelves, and other classroom objects to create a complete miniature learning environment.

Perhaps the most valuable lesson is that simple materials can be transformed through creativity. A collection of ordinary wooden sticks can become useful-looking furniture when the pieces are carefully planned and assembled. This encourages children to look at everyday materials in new ways.

Whether made at home, in a classroom, or as part of a school exhibition, a wooden-stick school table and chair provide an enjoyable hands-on experience. The project combines art with practical learning and gives children the satisfaction of creating something with their own hands. In the end, the tiny table and chair are not only attractive handmade objects but also examples of creativity, patience, teamwork, and simple engineering.

Leave a Reply

Your email address will not be published. Required fields are marked *