A giant cardboard pencil is a fun, colorful, and imaginative craft project that can bring the world of writing and learning to life. Instead of making a small pencil from paper, children can use large pieces of cardboard to create a giant model that looks like an oversized school pencil. This project is especially suitable for classrooms, school exhibitions, art activities, educational displays, and back-to-school decorations.
The giant cardboard pencil can be made from recycled cardboard boxes and decorated with colored paper, paint, markers, and other simple craft materials. Although the finished pencil may look like a simple decoration, making it requires planning, measuring, cutting, assembling, and decorating. These activities help children develop practical skills while encouraging creativity.
Understanding the Giant Cardboard Pencil
A pencil is one of the most familiar tools used by students. Children use pencils to write letters, solve mathematics problems, draw pictures, complete homework, and express their ideas.
A giant cardboard pencil represents this important school object on a much larger scale. It can be designed as a flat wall decoration, a three-dimensional standing model, or a large pencil-shaped classroom display.
The simplest version consists of a long cardboard body with a pointed end and a separate eraser at the opposite end. More advanced designs can include a realistic wooden tip, graphite point, metallic band, and colorful decorations.
Materials Needed

The main material is cardboard. Large recycled boxes are ideal because they provide broad, strong pieces that can be cut into the shape of a pencil.
Other materials may include yellow paper, pink paper, gray paper, black paper, glue, tape, scissors, a ruler, a pencil, markers, and paint.
A cardboard tube can also be used if a cylindrical pencil is desired. However, flat cardboard is usually easier for young children to work with.
Additional decorative materials can include stickers, colored foam, ribbon, string, buttons, or recycled packaging.
Using recycled cardboard is an excellent way to make the project inexpensive and environmentally friendly.
Planning the Pencil
Before cutting the cardboard, children should plan the size and shape of the pencil. A giant classroom pencil might be one meter long or even larger, depending on the available space.
A ruler or measuring tape can be used to draw a long rectangular body. The width should remain consistent along most of the pencil.
At one end, the shape should gradually become narrower to form the pencil point. At the other end, a rectangular or rounded section can represent the eraser.
A simple sketch helps children visualize the final design before they begin cutting.
Creating the Pencil Body
The main body can be made from a long piece of cardboard. If one large piece is unavailable, several smaller pieces can be joined together with strong tape.
The body can remain flat or be folded into a three-dimensional shape.
For a flat classroom decoration, the cardboard only needs to be cut into the outline of a pencil. For a standing model, several pieces can be folded or joined to create a stronger structure.
The edges should be checked carefully to make sure they are smooth and secure.
Adding the Pencil Point
The pointed end is one of the most recognizable features of a pencil. It can be created by drawing two diagonal lines that meet at a point.
The wooden section can be covered with light brown or beige paper. A small black or dark-gray triangle can represent the graphite tip.
Children can draw wood-grain lines on the brown section to make it look more realistic.
The point can also be created with several folded pieces of cardboard if a three-dimensional appearance is desired.
Creating the Pencil Eraser
The opposite end of the pencil can be decorated with a large pink or red eraser.
A piece of pink cardboard or paper can be attached to the back of the pencil. The eraser can be rectangular, rounded, or slightly curved.
Children can draw small lines or textures on the eraser to make it look more realistic.
The large eraser creates a fun contrast with the yellow body and helps viewers immediately recognize the object.
Adding the Metallic Band
Many traditional pencils have a metal-colored band between the wooden body and the eraser.
This part can be created with silver or gray paper. Aluminum foil can also be used if it is attached carefully to the cardboard.
The band can be divided into several narrow sections using dark lines.
This small detail can make the giant pencil look much more realistic.
Decorating the Pencil Body
The body of the pencil can be covered with bright yellow paper, painted yellow, or decorated with another color.
Although yellow is traditional, children can create pencils in any color they like. A blue pencil, green pencil, rainbow pencil, or multicolored pencil can become a unique classroom decoration.
Black lines can be added along the sides to represent the edges of a wooden pencil.
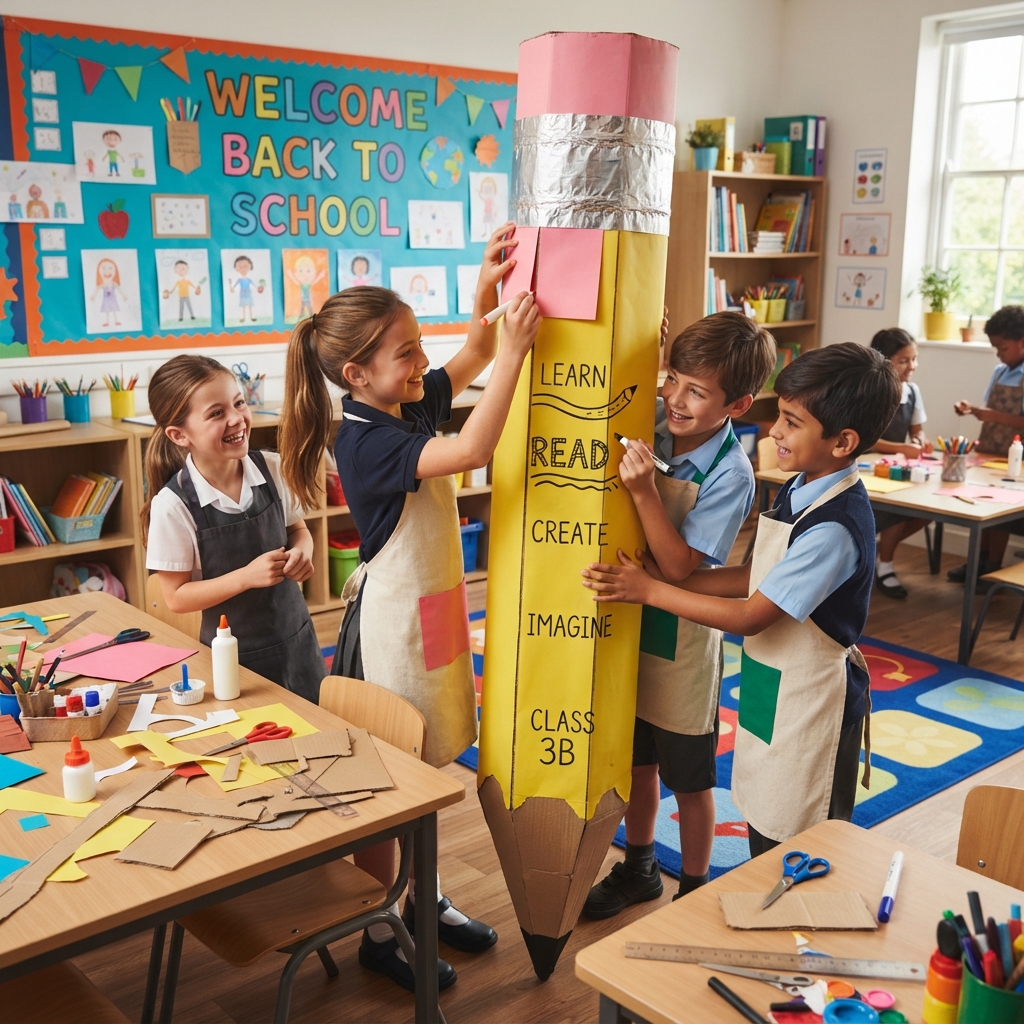
Children can also write a school name, classroom number, inspirational word, or educational message on the body.
Adding a Giant Pencil Label
A large label can make the pencil more meaningful. For example, students can write “LEARN,” “CREATE,” “READ,” “WRITE,” or “DREAM” on the pencil.
These words can remind students about the purpose of education.
A teacher might also write the name of the class on the pencil and place it near the classroom entrance.
The label can be made from separate paper letters or written directly onto the cardboard.
Making the Pencil Three-Dimensional
A three-dimensional pencil is more challenging but can create an impressive result.
One method is to construct a long cardboard tube with a pointed cardboard cone at one end. Another method is to create a rectangular prism with folded cardboard.
The outer surface can then be covered with colored paper.
The point can be made from folded triangular pieces, while the eraser can be constructed from soft cardboard or layered paper.
A three-dimensional pencil can stand upright if a strong cardboard base is attached underneath.
Creating a Classroom Display
A giant cardboard pencil can become the central feature of a classroom display. It can be placed beside a bulletin board or near the teacher’s desk.
The pencil can be surrounded by paper letters, numbers, books, stars, and other school-themed decorations.
Students can also create several smaller cardboard pencils and arrange them around the giant one.
A classroom display could include the message “Welcome Back to School” along with the giant pencil.
This makes the craft particularly suitable for the beginning of a new school year.
Educational Benefits
The giant cardboard pencil offers many educational benefits. It encourages creativity because students must decide how to transform cardboard into a recognizable object.
The project also develops fine motor skills through drawing, cutting, folding, gluing, and decorating.
Measurement skills are practiced when students determine the length and width of the pencil.
The project can also introduce children to shapes. The pencil body can be understood as a rectangle or rectangular prism, while the point resembles a triangle or cone.
Learning About Recycling
Using cardboard from old boxes teaches children about recycling and reuse.
Instead of throwing away packaging, students can transform it into a useful educational decoration.
Teachers can explain that creative reuse reduces waste and encourages responsible use of resources.
The giant pencil therefore combines art with environmental education.
Working Together
A giant pencil can be large enough to require several students to work together.
One group can measure and cut the body, another can prepare the pencil point, and another can create the eraser and metallic band.
Students can then work together to assemble and decorate the final model.
This encourages teamwork, communication, patience, and shared responsibility.
Each student can contribute a small part to the finished project.
Adding Creative Features
Children can make the giant pencil even more interesting by adding creative features.
For example, the pencil could have a large paper speech bubble saying, “Learning is an Adventure!”
It could also have small drawings of books, stars, school buildings, animals, or mathematical symbols.
A large pencil can even be designed as a photo-frame decoration. A circular opening can be cut into the body so that students can stand behind it for photographs.
This turns the craft into an interactive classroom activity.
Common Challenges
One challenge is keeping the cardboard straight. If the cardboard is bent, it may be difficult to create a neat pencil.
Using strong cardboard and adding support strips to the back can help.
Another challenge is attaching large pieces of paper without wrinkles. Applying glue evenly and smoothing the paper carefully can produce a cleaner result.
If the pencil is designed to stand upright, the base must be wide and stable enough to prevent it from falling.
These challenges provide opportunities for students to improve their construction skills.
Safety Tips
Safety is important when working with cardboard. Children should use scissors carefully and receive adult assistance when cutting very thick cardboard.
Sharp craft knives should only be used by adults.
Glue should be used according to its instructions, and the workspace should remain clean.
If paint is used, children should wear suitable protective clothing and work in an appropriate area.
Large cardboard pieces should also be handled carefully to prevent them from hitting nearby objects or people.
Turning the Pencil Into a Learning Activity
The giant pencil can be used for more than decoration. Teachers can incorporate it into classroom lessons.
For example, students can write new vocabulary words on paper pencils and attach them to the giant model.
A mathematics class might decorate the pencil with numbers and geometric shapes.
An art class could use the pencil as a starting point for a lesson about drawing tools.
A language class might ask students to write short sentences about why pencils are useful.
This flexibility makes the giant cardboard pencil a valuable educational prop.
Conclusion
A giant cardboard pencil is a creative school craft that combines imagination, recycling, art, and education. With a few large pieces of cardboard, colored paper, glue, scissors, and decorating materials, students can create an impressive oversized version of a familiar classroom object.
The project can be simple or advanced. A flat pencil can become a colorful wall decoration, while a three-dimensional pencil can stand as a large classroom display. Children can add realistic features such as a wooden point, graphite tip, metallic band, and eraser, or they can design a completely imaginative pencil.
The activity develops important skills. Children practice measuring, cutting, assembling, decorating, and problem-solving. They also learn about shapes, structure, teamwork, and recycling.
Most importantly, the giant pencil can represent the power of learning. A pencil may be a small everyday tool, but it allows students to write stories, solve problems, draw pictures, and record ideas. Turning that simple object into a giant cardboard model makes its educational importance visible.
Whether used for a school exhibition, classroom decoration, art lesson, or back-to-school project, the giant cardboard pencil is an enjoyable activity for children. It demonstrates that ordinary recycled materials can become extraordinary creations when combined with imagination and careful work. The finished pencil can brighten a classroom while reminding students that every great idea can begin with something as simple as a pencil.