Friendship bracelets are a fun and colorful craft that children and beginners can easily make. They are a wonderful way to celebrate friendship, share creativity, and create a small handmade gift for someone special.
With colorful beads, craft cord, embroidery thread, or stretchy string, there are many simple bracelet designs to try. These projects are perfect for school activities, birthday parties, summer crafts, or a relaxing afternoon at home.
Materials Needed
Before making a friendship bracelet, gather a few basic supplies:
- Colorful pony beads
- Stretch cord or strong craft cord
- Embroidery thread, optional
- Letter beads
- Small decorative beads
- Scissors
- Tape, optional, for holding the bracelet while working
For young children, larger beads and easy-to-handle materials are best.

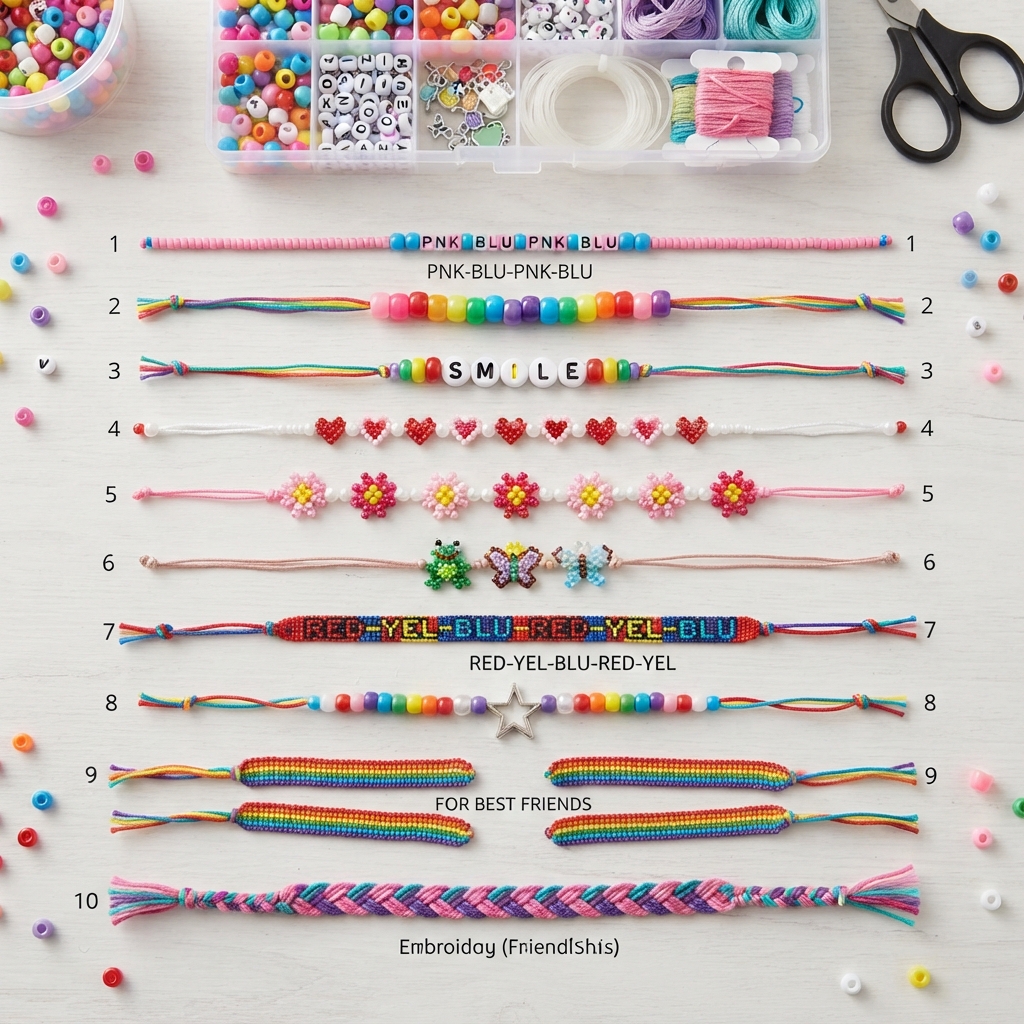
1. Simple Two-Color Bracelet
A two-color bracelet is one of the easiest designs for beginners.
Choose two favorite colors, such as pink and blue. Thread the beads in a repeating pattern:
Pink – Blue – Pink – Blue
Continue until the bracelet is long enough to fit comfortably around the wrist. Secure the ends with a strong knot.
2. Rainbow Friendship Bracelet
Rainbow bracelets are bright, cheerful, and easy to customize.
Use red, orange, yellow, green, blue, and purple beads. Arrange them in rainbow order or repeat the colors throughout the bracelet.
Children can make matching rainbow bracelets for their best friends.
3. Personalized Name Bracelet
Letter beads make friendship bracelets extra special.
Use letter beads to spell a friend’s name, nickname, or a short word such as:
- FRIEND
- SMILE
- HAPPY
- LOVE
- BEST
Add colorful pony beads on both sides of the letters to complete the bracelet.
4. Heart Friendship Bracelet
A heart pattern is perfect for showing someone you care.
Use red, pink, or purple beads to create small heart shapes. Place colorful beads between the hearts to create a repeating design.
This bracelet can make a sweet gift for a best friend, sibling, parent, or classmate.
5. Flower Friendship Bracelet
Flowers are another easy design.
Choose several beads for each flower’s petals and one contrasting bead for the center. Repeat the flower pattern along the bracelet.
Try making pink flowers with yellow centers, purple flowers with white centers, or colorful rainbow flowers.
6. Beaded Animal Friendship Bracelet
Children who love animals can add small beaded animal designs to their bracelets.
Try creating tiny:
- Frogs
- Butterflies
- Fish
- Turtles
- Cats
- Dogs
- Pandas
A small animal can be placed in the center of the bracelet and surrounded by colorful beads.
7. Patterned Pony Bead Bracelet
Repeating patterns are easy for beginners to learn.
Try:
Red – Yellow – Blue – Red – Yellow – Blue
or:
Purple – Pink – White – Purple – Pink – White
Children can invent their own patterns and challenge their friends to copy them.
8. Friendship Bracelet With Charms
Small charms can add a special touch to a simple bracelet.
Choose a heart, star, flower, butterfly, or another lightweight charm. Place it in the center of a beaded bracelet.
The charm can represent something the two friends enjoy together.
9. Matching Best-Friend Bracelets
Two matching bracelets are a fun way for friends to celebrate their friendship.
Use the same colors and pattern for both bracelets. You can also make each bracelet slightly different by reversing the color order.
For example:
Friend 1: Pink – Blue – Pink – Blue
Friend 2: Blue – Pink – Blue – Pink
10. Braided Friendship Bracelet
Not every friendship bracelet needs beads. Beginners can also use embroidery thread.
Choose three or four colors, cut several strands, and tie them together. Braid the strands until the bracelet reaches the desired length.
Finish with a secure knot.
How to Make a Simple Beaded Friendship Bracelet
Here is a basic method that works for many designs:
Step 1: Choose Your Colors
Pick two to six favorite colors.
Step 2: Prepare the Cord
Cut a piece of stretchy or strong craft cord. Leave extra length for tying the bracelet.
Step 3: Plan the Pattern
Place the beads on a table in the order you want to use them.
Step 4: Thread the Beads
Carefully thread each bead onto the cord.
Step 5: Check the Size
Wrap the bracelet around the wrist to make sure it fits comfortably.
Step 6: Secure the Bracelet
Tie the ends together with a strong knot. An adult can help younger children with this step.
Why Children Love Making Friendship Bracelets
Friendship bracelets are more than colorful accessories. Making them encourages children to think about others and create something meaningful.
Beading also helps develop fine motor skills, hand-eye coordination, concentration, patience, counting, and pattern recognition.
Giving a handmade bracelet to a friend can also teach children the joy of sharing and thoughtful gift-giving.
Tips for Beginners
Start with simple patterns instead of complicated designs. Two or three colors are usually enough for a first project.
Organize beads in small containers so they are easy to find. It can also help to place the beads in order before starting.
If you make a mistake, don’t worry. Carefully remove the beads and try again. Each project provides an opportunity to practice.
Safety Tips
Small beads can be a choking hazard, so young children should always make friendship bracelets under adult supervision. Keep beads away from babies and toddlers.
Adults should help children when using scissors and securing knots.
Conclusion
Making friendship bracelets is an easy and enjoyable craft for children and beginners. From simple two-color patterns and rainbows to hearts, flowers, names, animals, and braided designs, there are countless ways to create a special bracelet.
With a few colorful materials and a little creativity, children can make beautiful handmade bracelets that celebrate friendship and bring smiles to the people they care about.